I like my bike brakes to be nice and grippy—I want to be able to stop quickly when I need to, even if I’m going fast. I want the braking to start almost as soon as I touch the brake lever, but most bike brakes are set way too “soft” for me. My local bike shop charges $15 to adjust both brakes… Here’s how to fix them yourself, the easy way.
Here’s the video first; the pictures and description follow.

Bike parts
There are lots of names for bike parts, but most bikes have pretty much the same assortment. Here’s what I’ll use in this article:
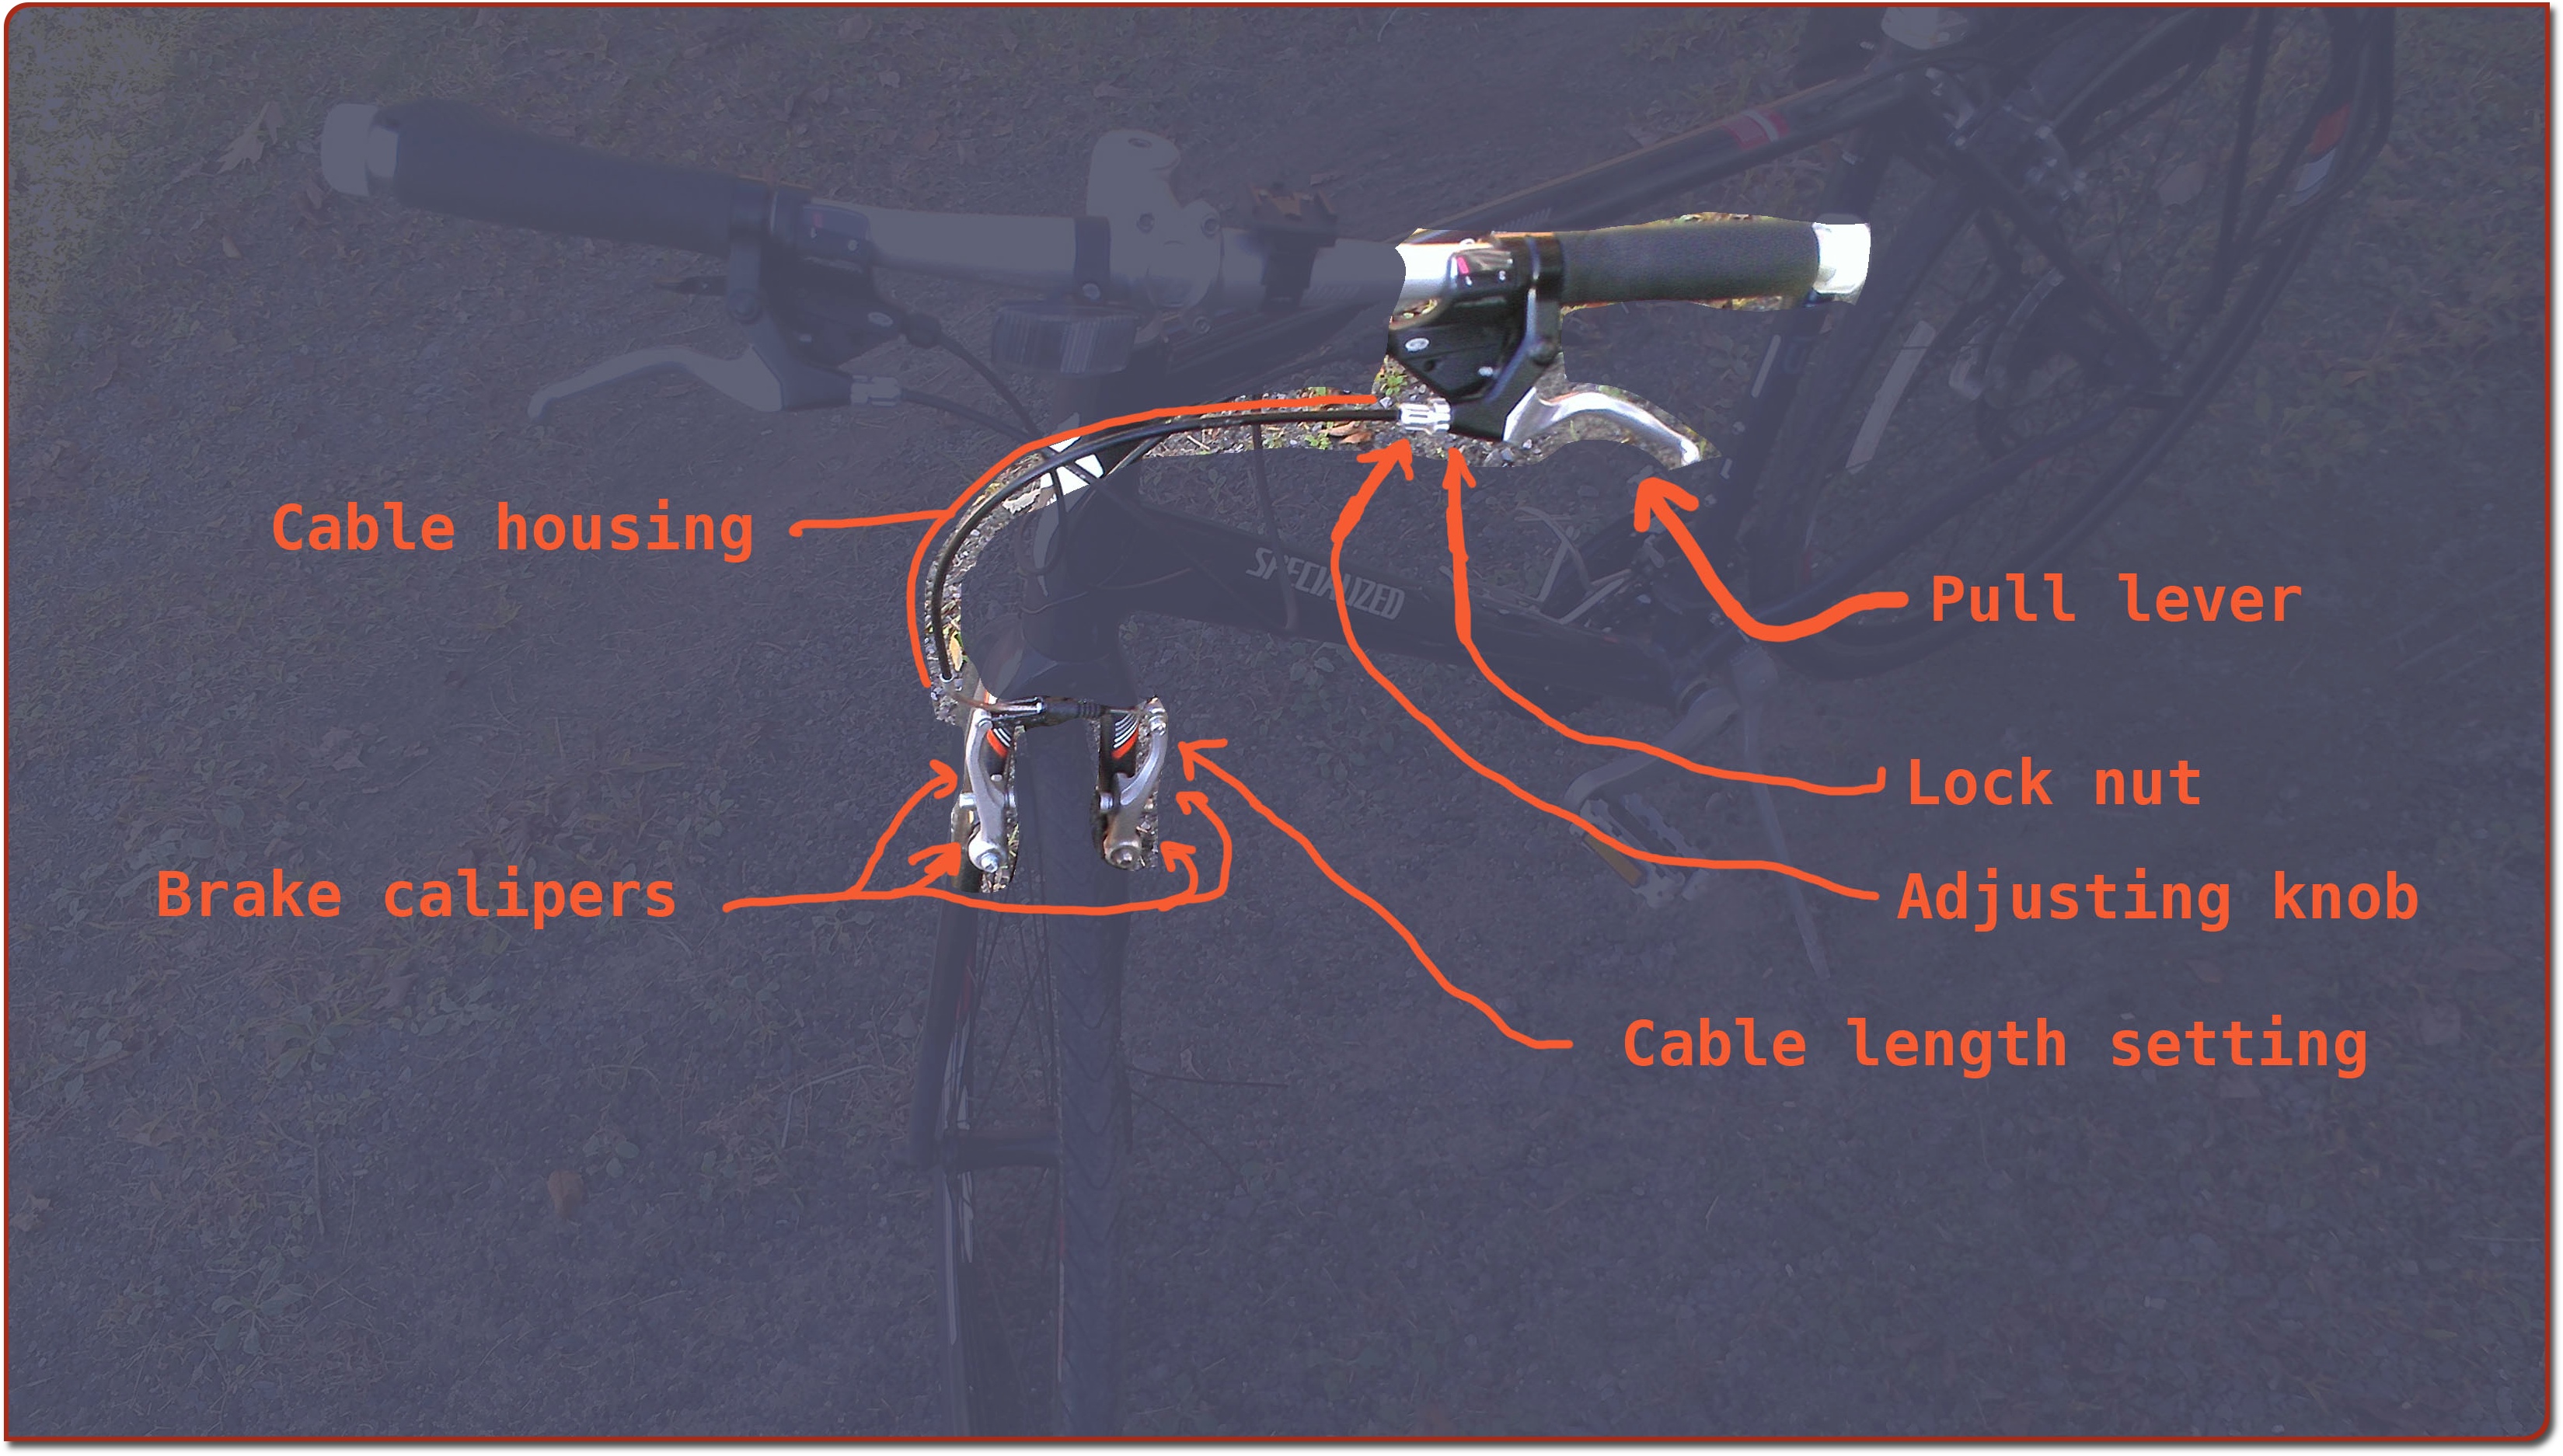
- Pull lever. What your hand goes on. Pull to operate the brake.
- Cable (hidden) and cable housing. Connects the pull lever to the brake calipers.
- Brake calipers. These clamp together to squeeze brake pads (pieces of rubber, not shown) onto the wheel’s rim to stop the bike.
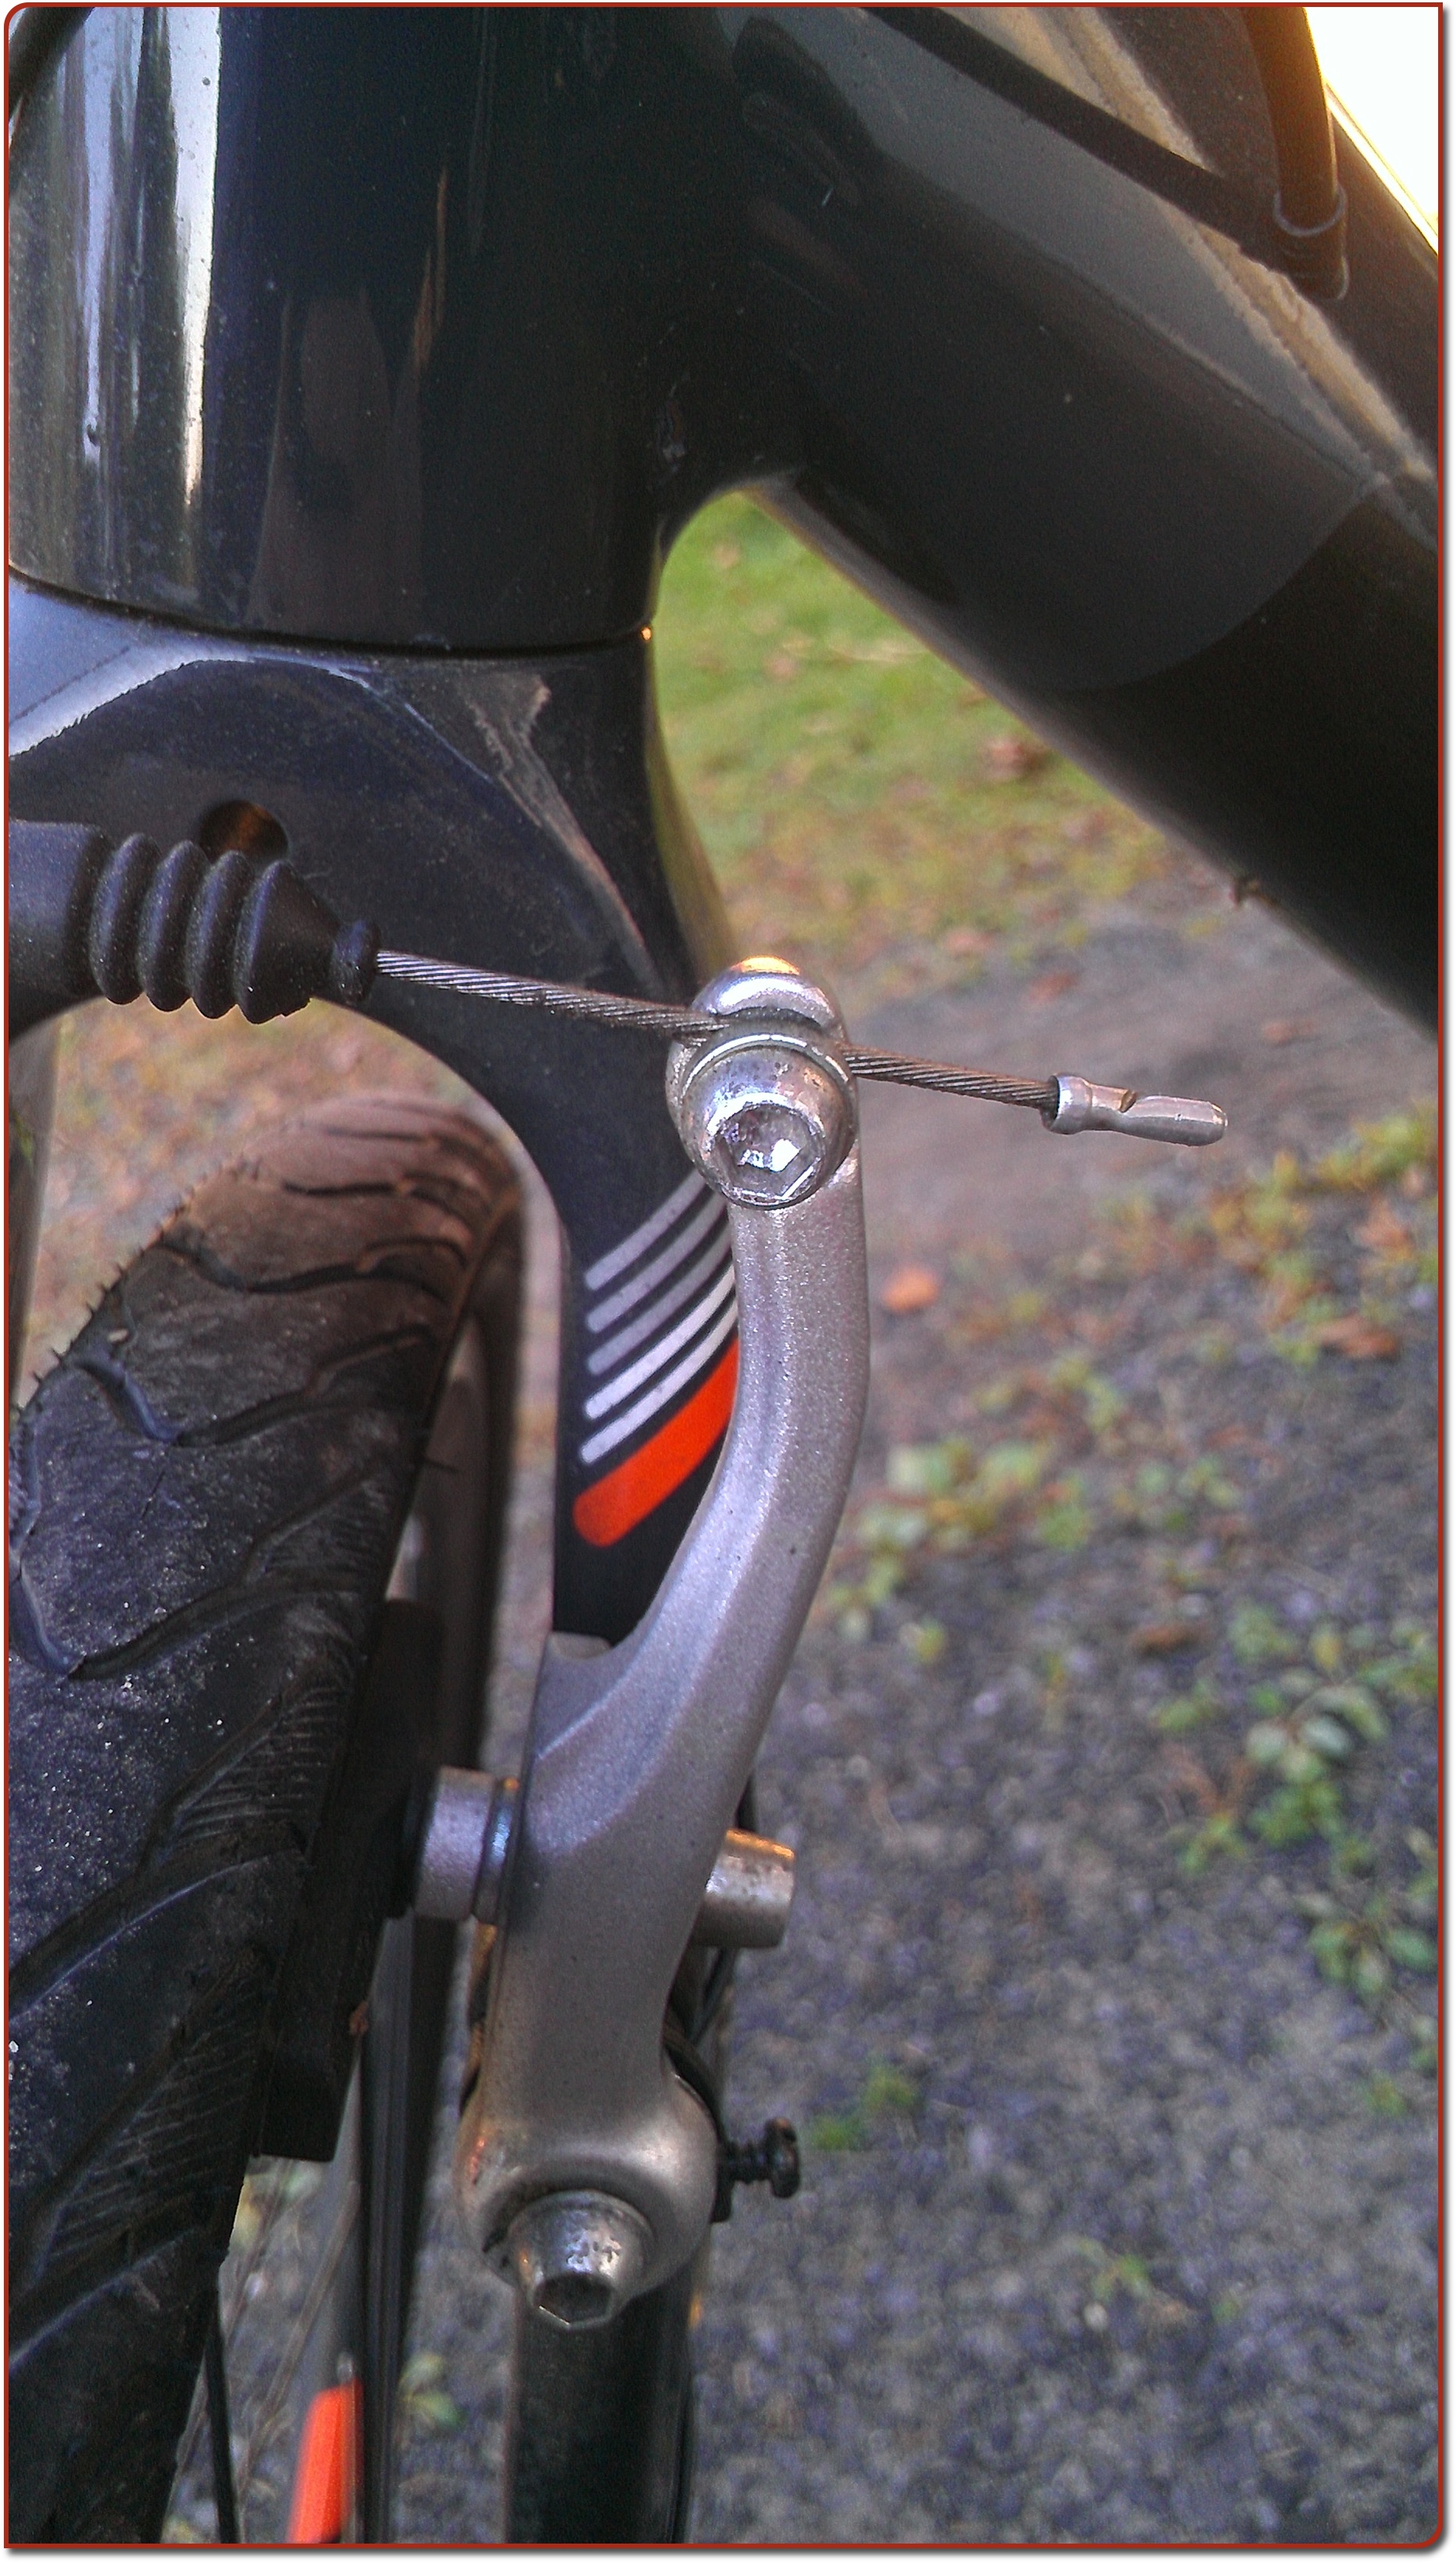
- Adjusting knob. This allows you to adjust the length of the cable housing.
- Lock nut. Locks the position of the adjusting knob so it doesn’t go out of whack.
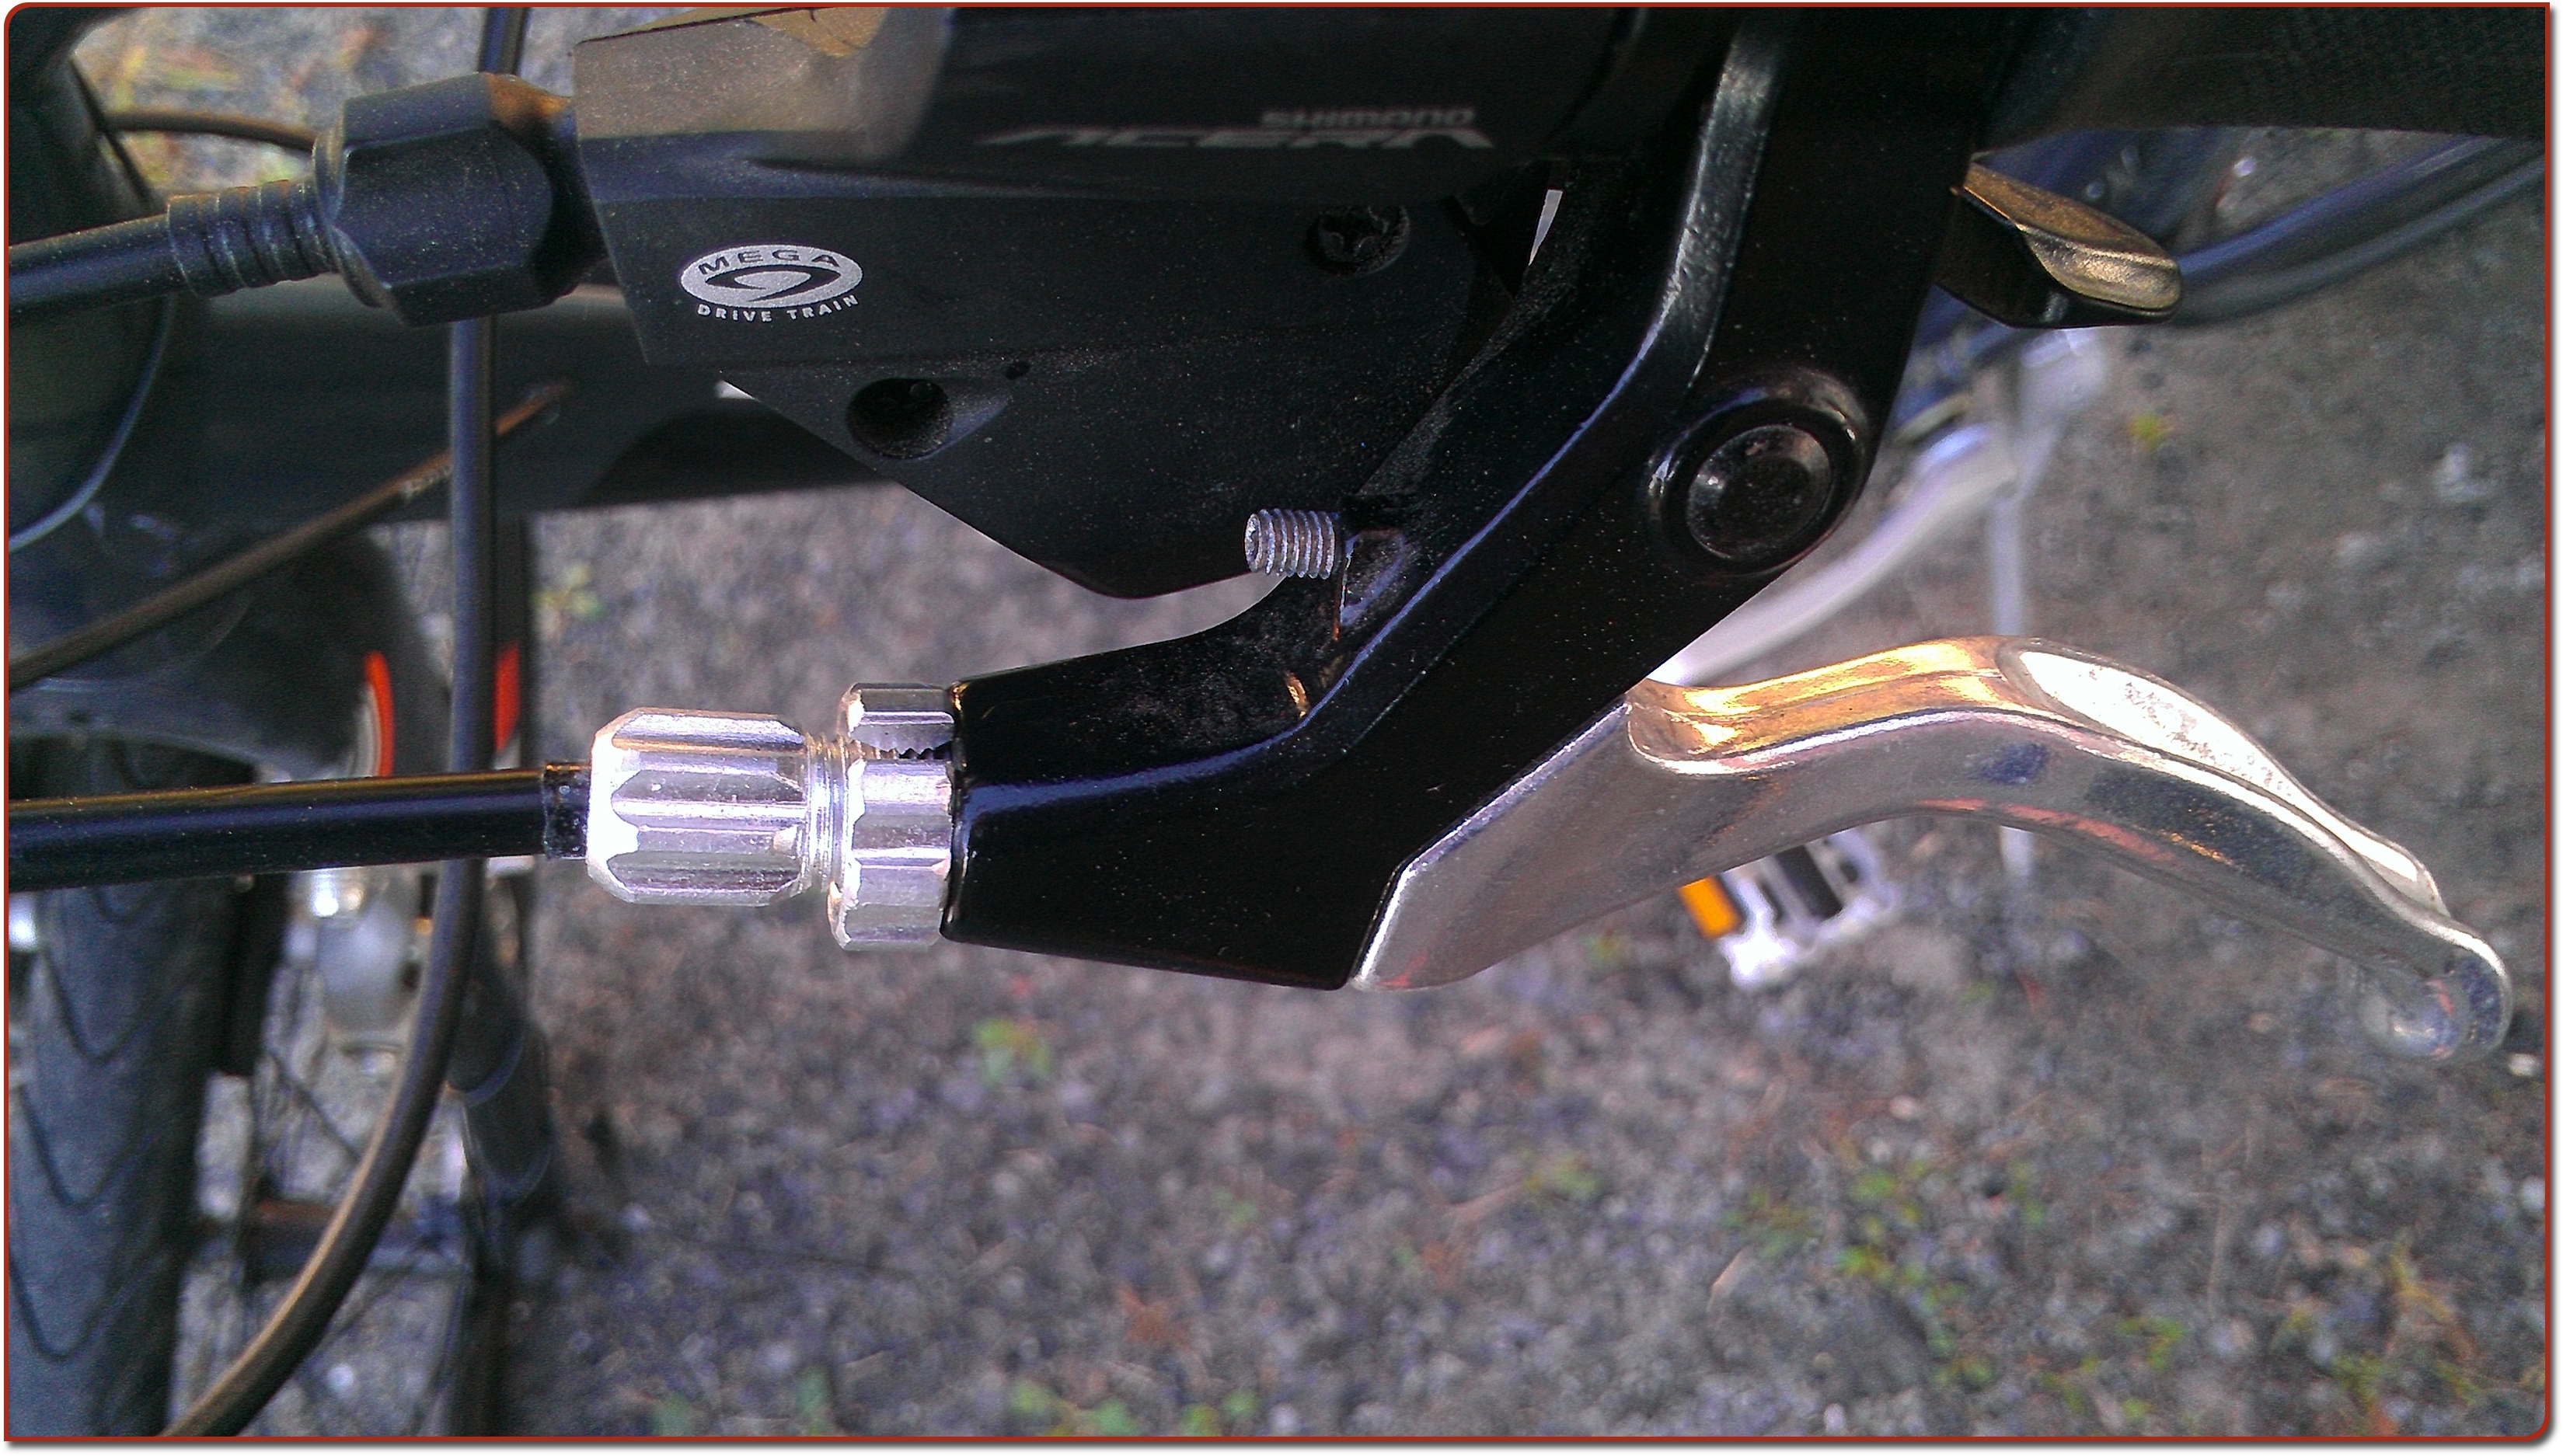
- Cable length setting. This is a screw or bolt that physically attaches the brake cable to the calipers. It can also be used to shorten or lengthen the cable, though that’s usually not necessary.
Things to check before you start
I’m writing about standard caliper brakes, as used on most of the bikes I’ve seen in the last decade. If your bike’s brakes are different, this will probably still work, but your mileage might vary.
Check to make sure that there’s still plenty of rubber on the brake pads, and that they’re aligned with the rims (they usually will be). If you need new brake pads, your local shop has them, or you can get them here. Also make sure the bolt on the cable length setting is fully tightened (it usually will be).
One caveat: we’re going to mess with your brakes. Once you’re done, make sure that you test them carefully by spinning the wheels in the air and squeezing the pulls, to make sure they’re functioning properly. Do this before you get on the bike. Seriously.
Adjusting the brakes
For reference, here’s my bike with the pull lever in resting position:
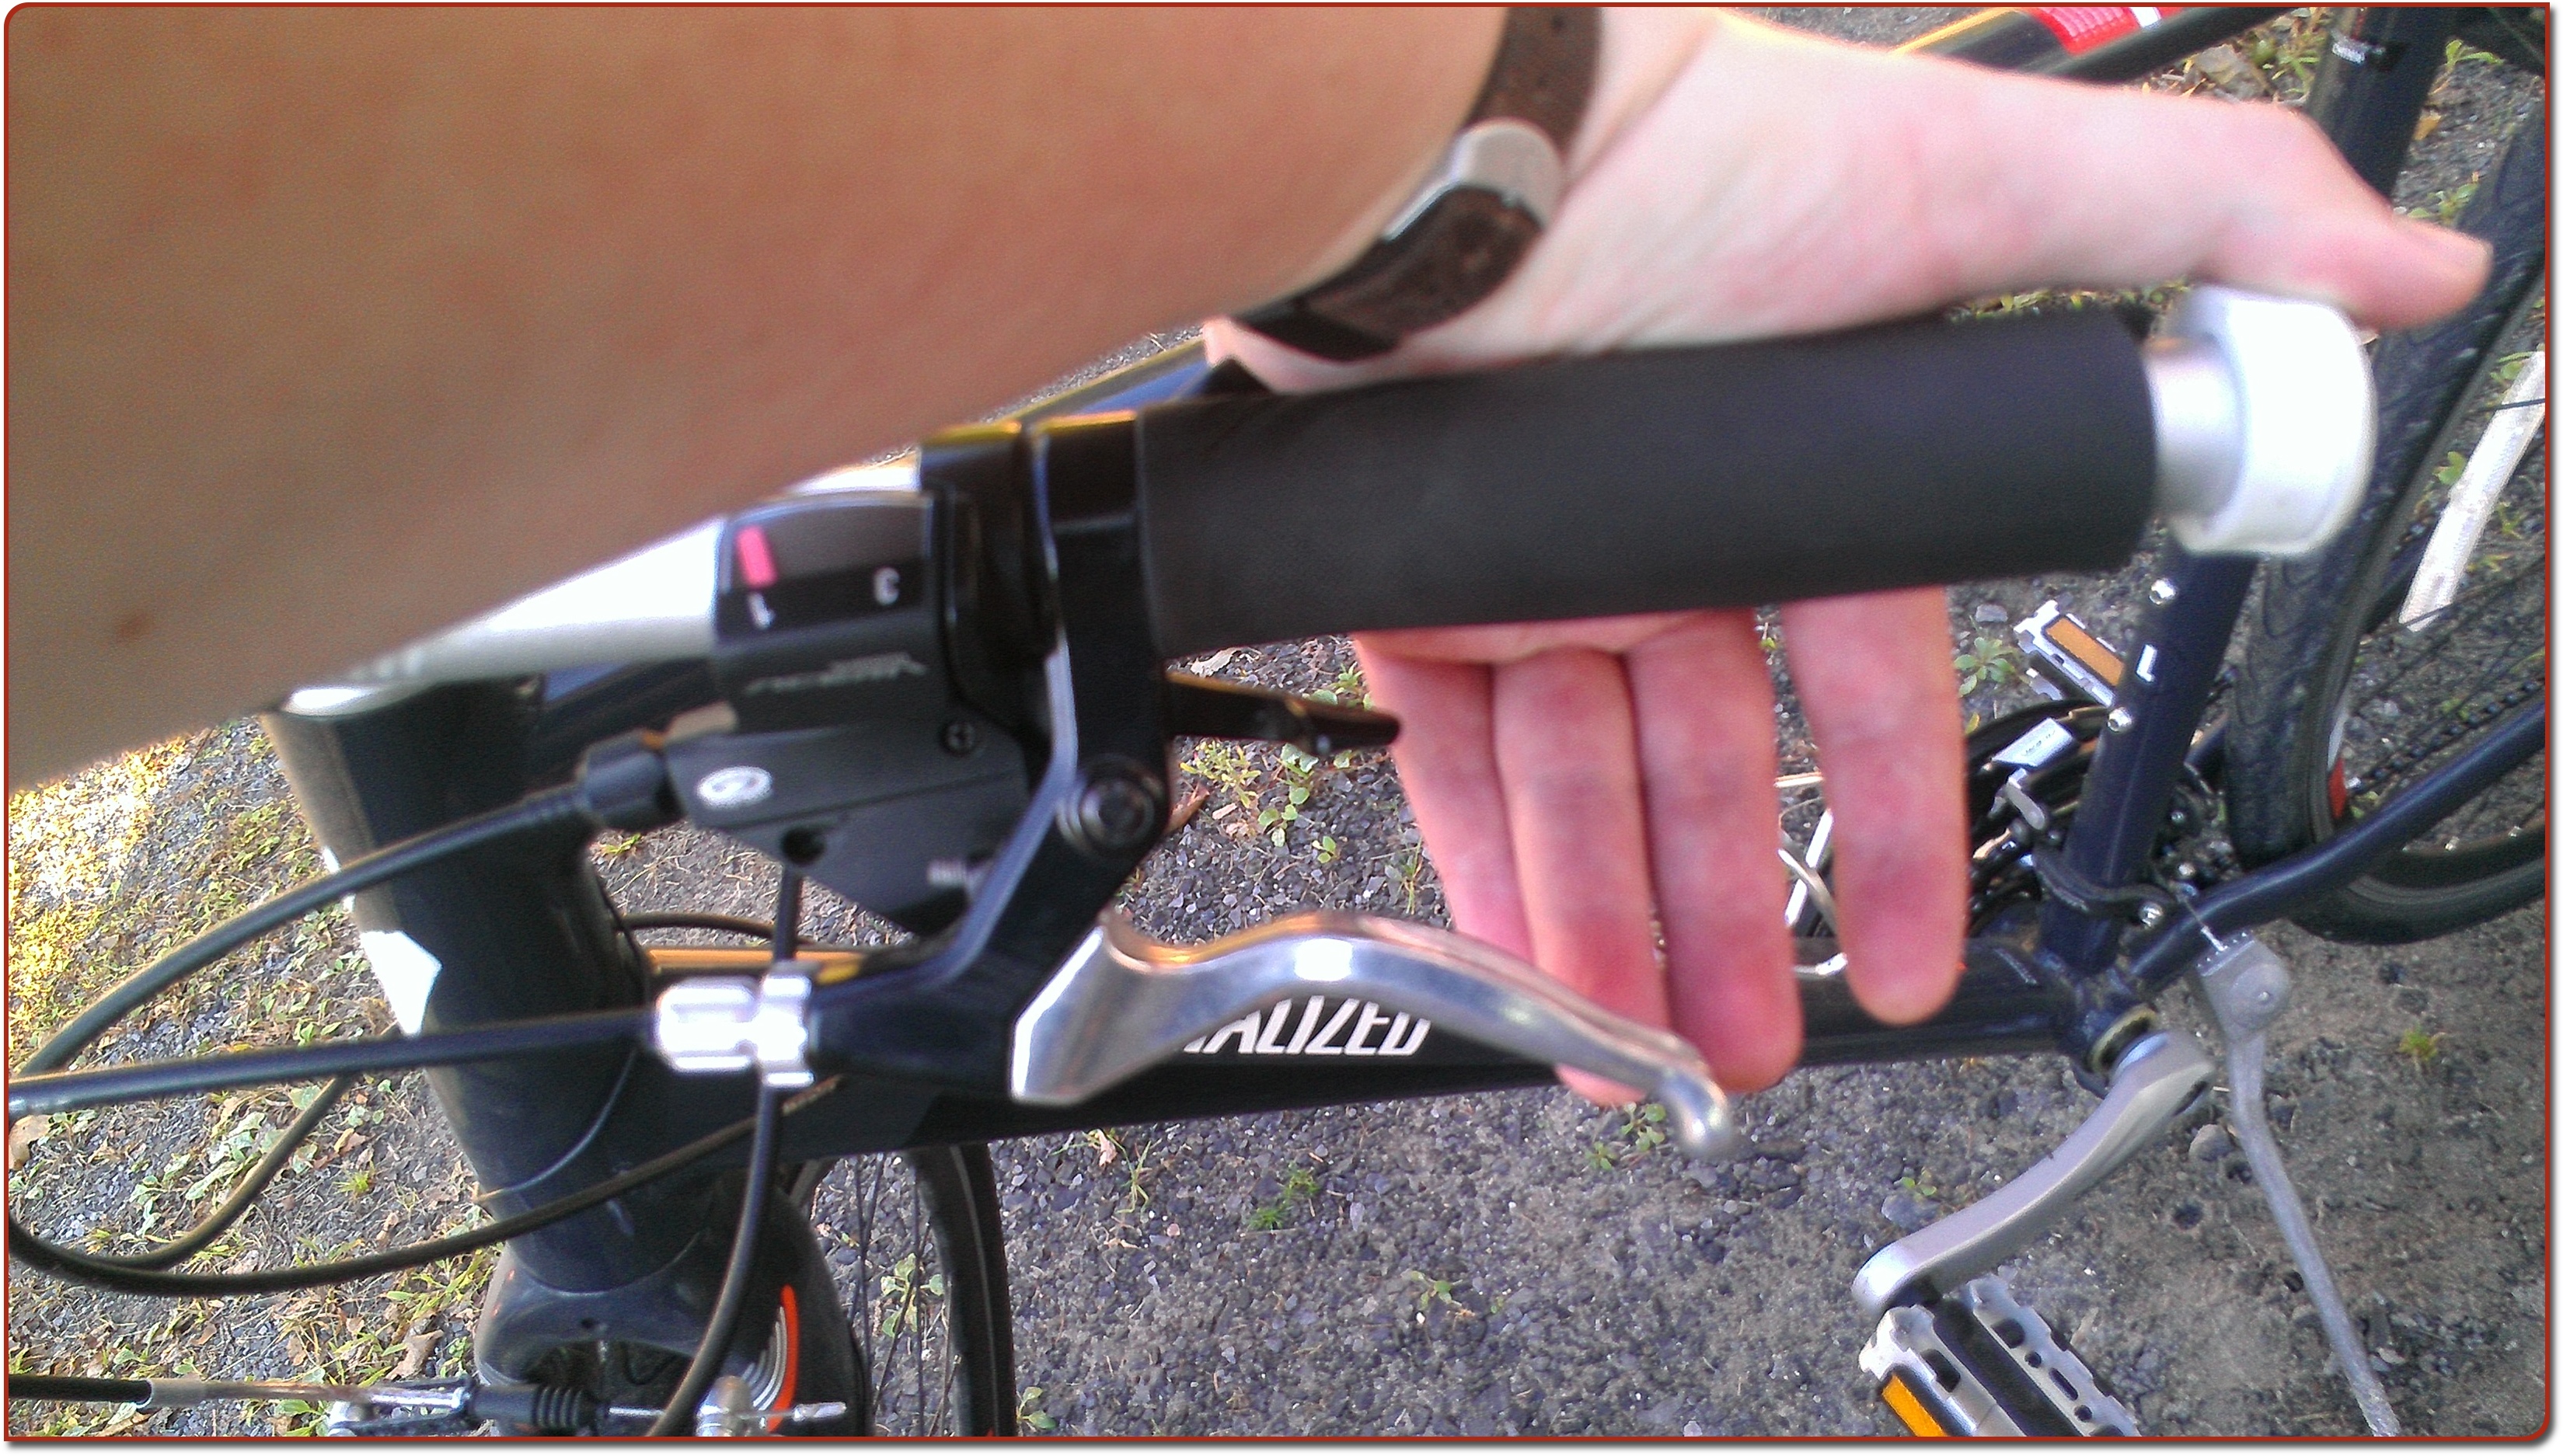
And here’s where I want the lever to be when the brakes are fully engaged:

For me, that’s a good compromise that gives me plenty of braking power and speed while still making sure the brakes don’t engage when I’m just riding along.
Method
We’re not actually going to adjust the brake cable’s length. We’re going to adjust the housing’s length, which ends up having the same effect: make the housing longer, the cable becomes (relatively) shorter.
You can do this with a bunch of complicated steps. I find it helpful to think of it as just two steps, though:
- Make the brakes as tight as they can go, so that they’re fully engaged when the lever is in resting position.
- Back off from that position until you hit a comfortable balance where the brake is normally off but still quick and grippy to use.
The advantage of this approach is that you only make the adjustment once, and then you’re done. Other ways I’ve been taught to adjust brakes involve doing a lot of “make a small change, then test it. Now make another small change, then test it.” That eats time.
I’m going to demonstrate on my bike’s front brakes, but the principle is the same for the back brakes.
Release the lock nut
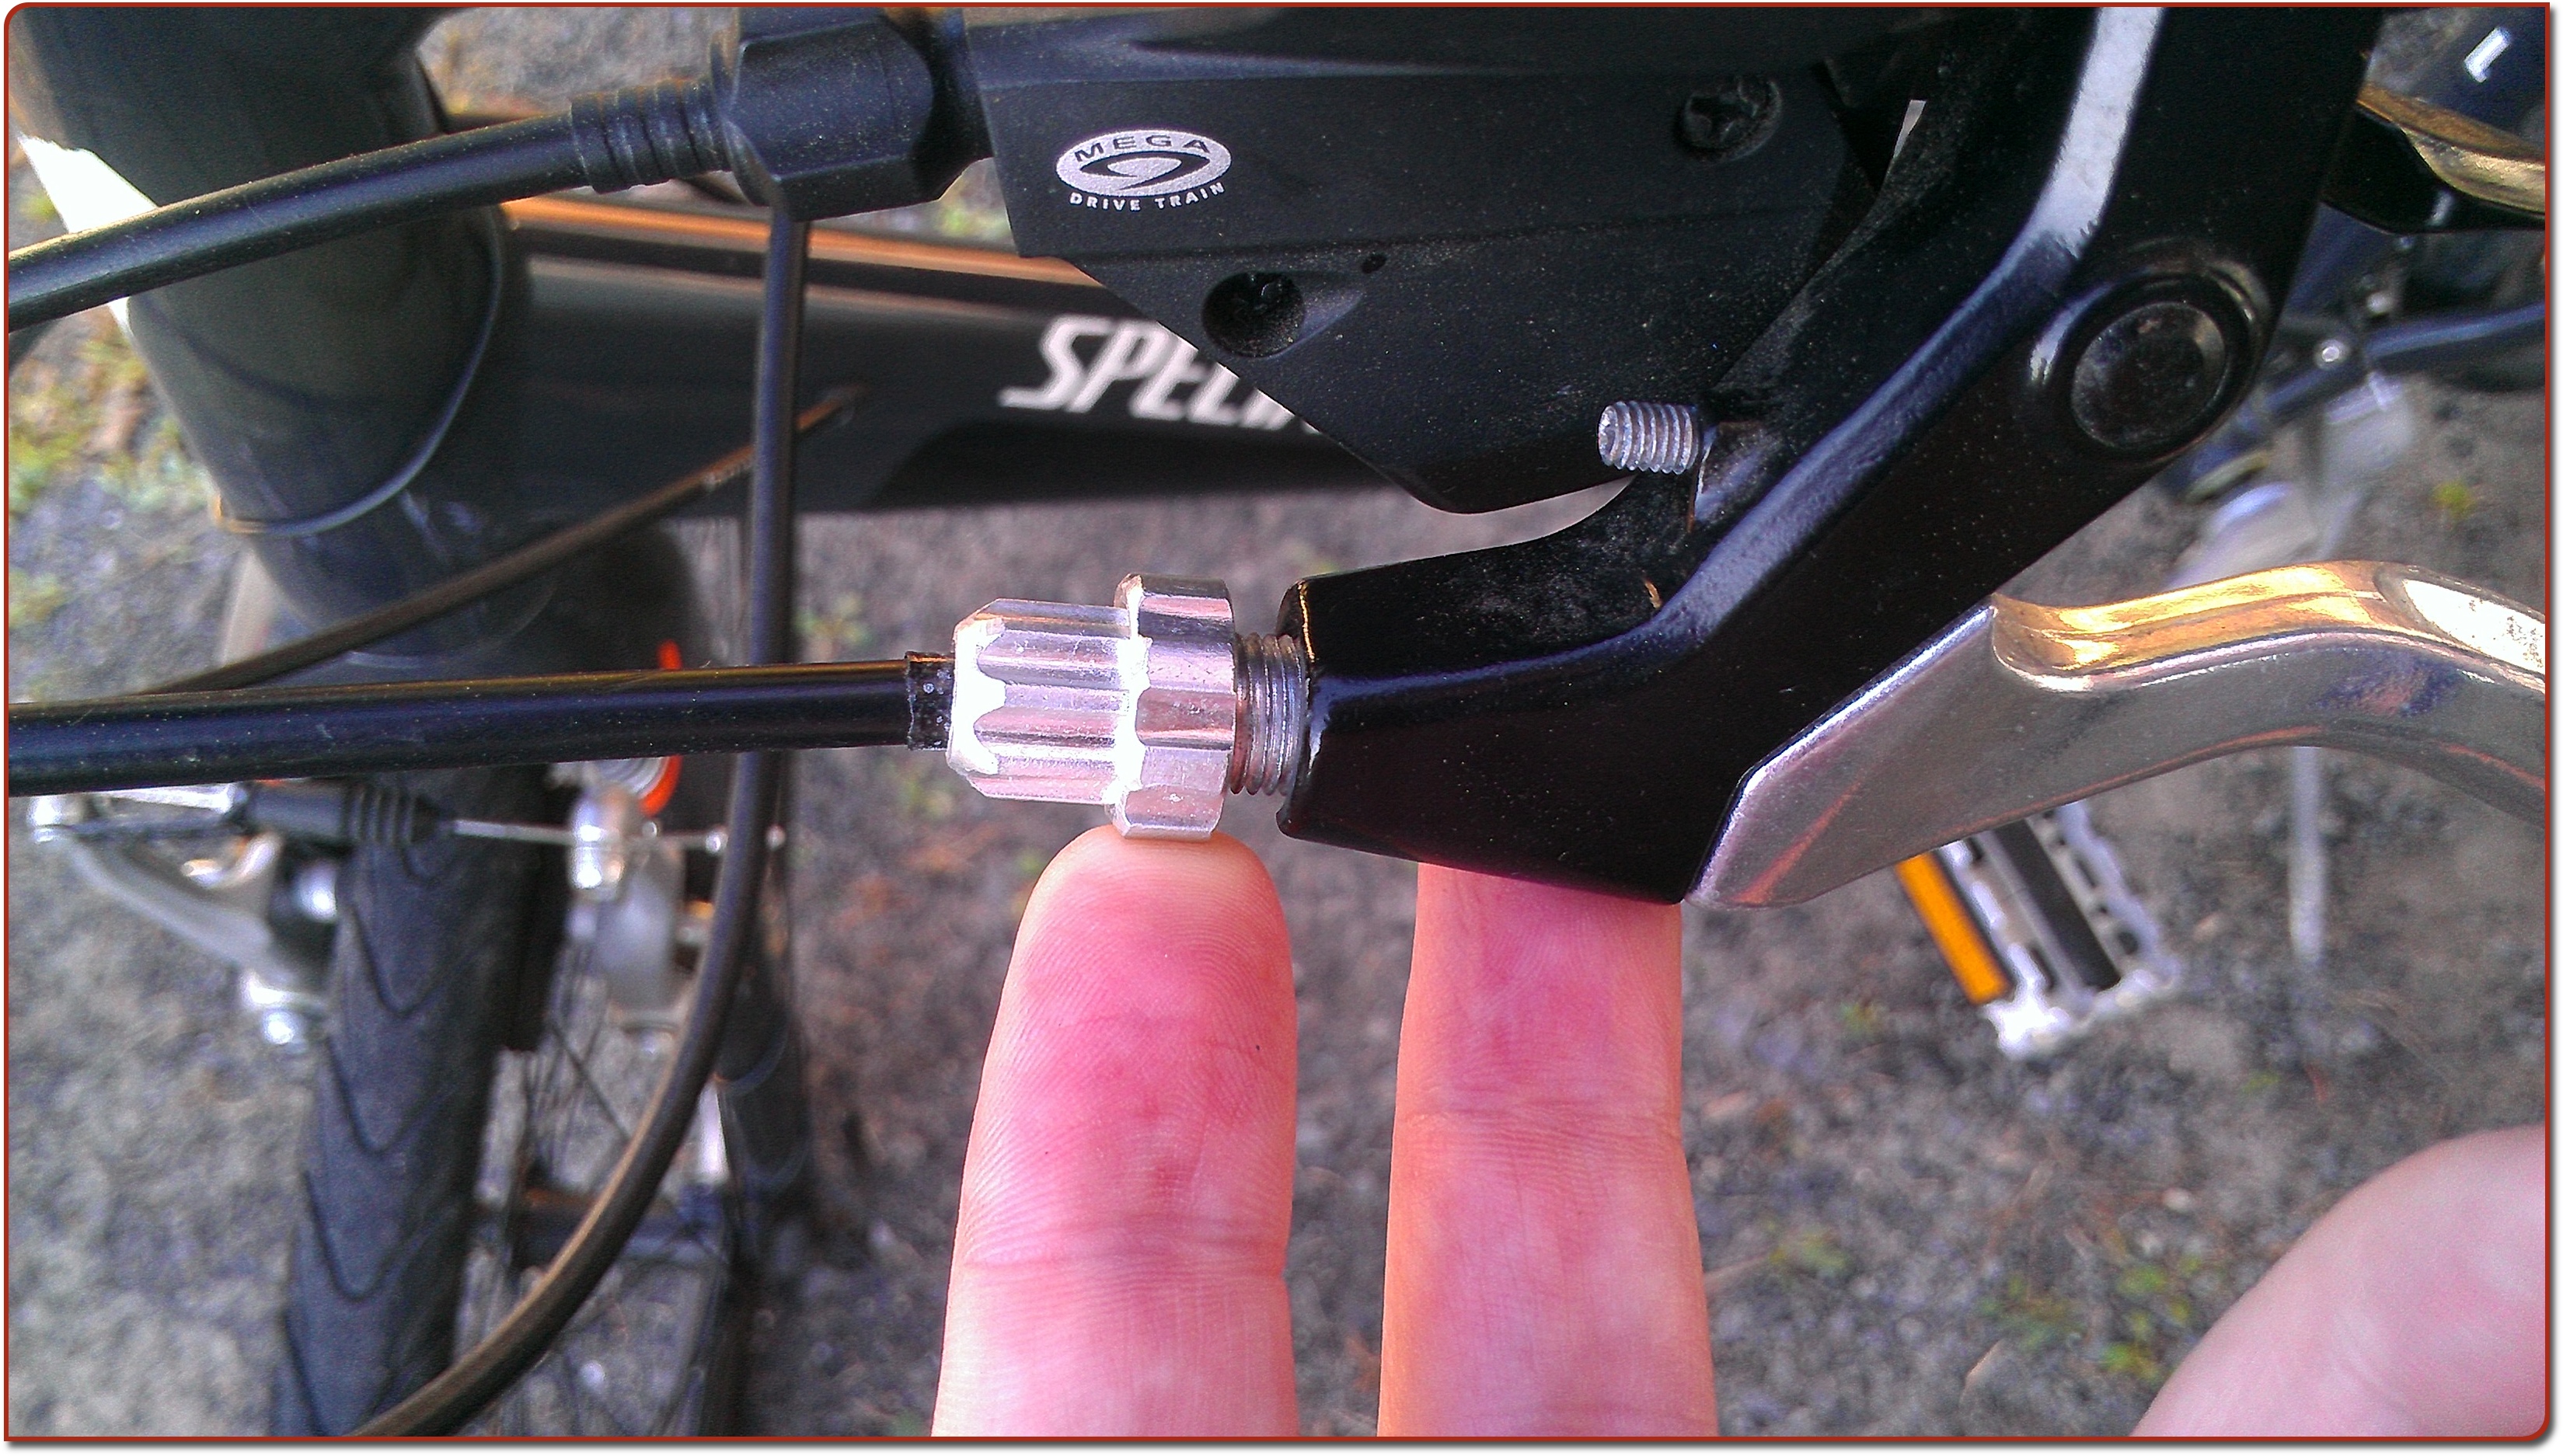
The lock nut is the one closer to the lever pull, and all it does is hold the adjustment knob in place.
Unscrew the lock nut as far as it can go. On my bike, that’s what you see above.
Clamp the calipers with your hand
Grasp both calipers near the pads:
And squeeze inward so that the calipers close and the brake pads come to rest on the wheel rims.
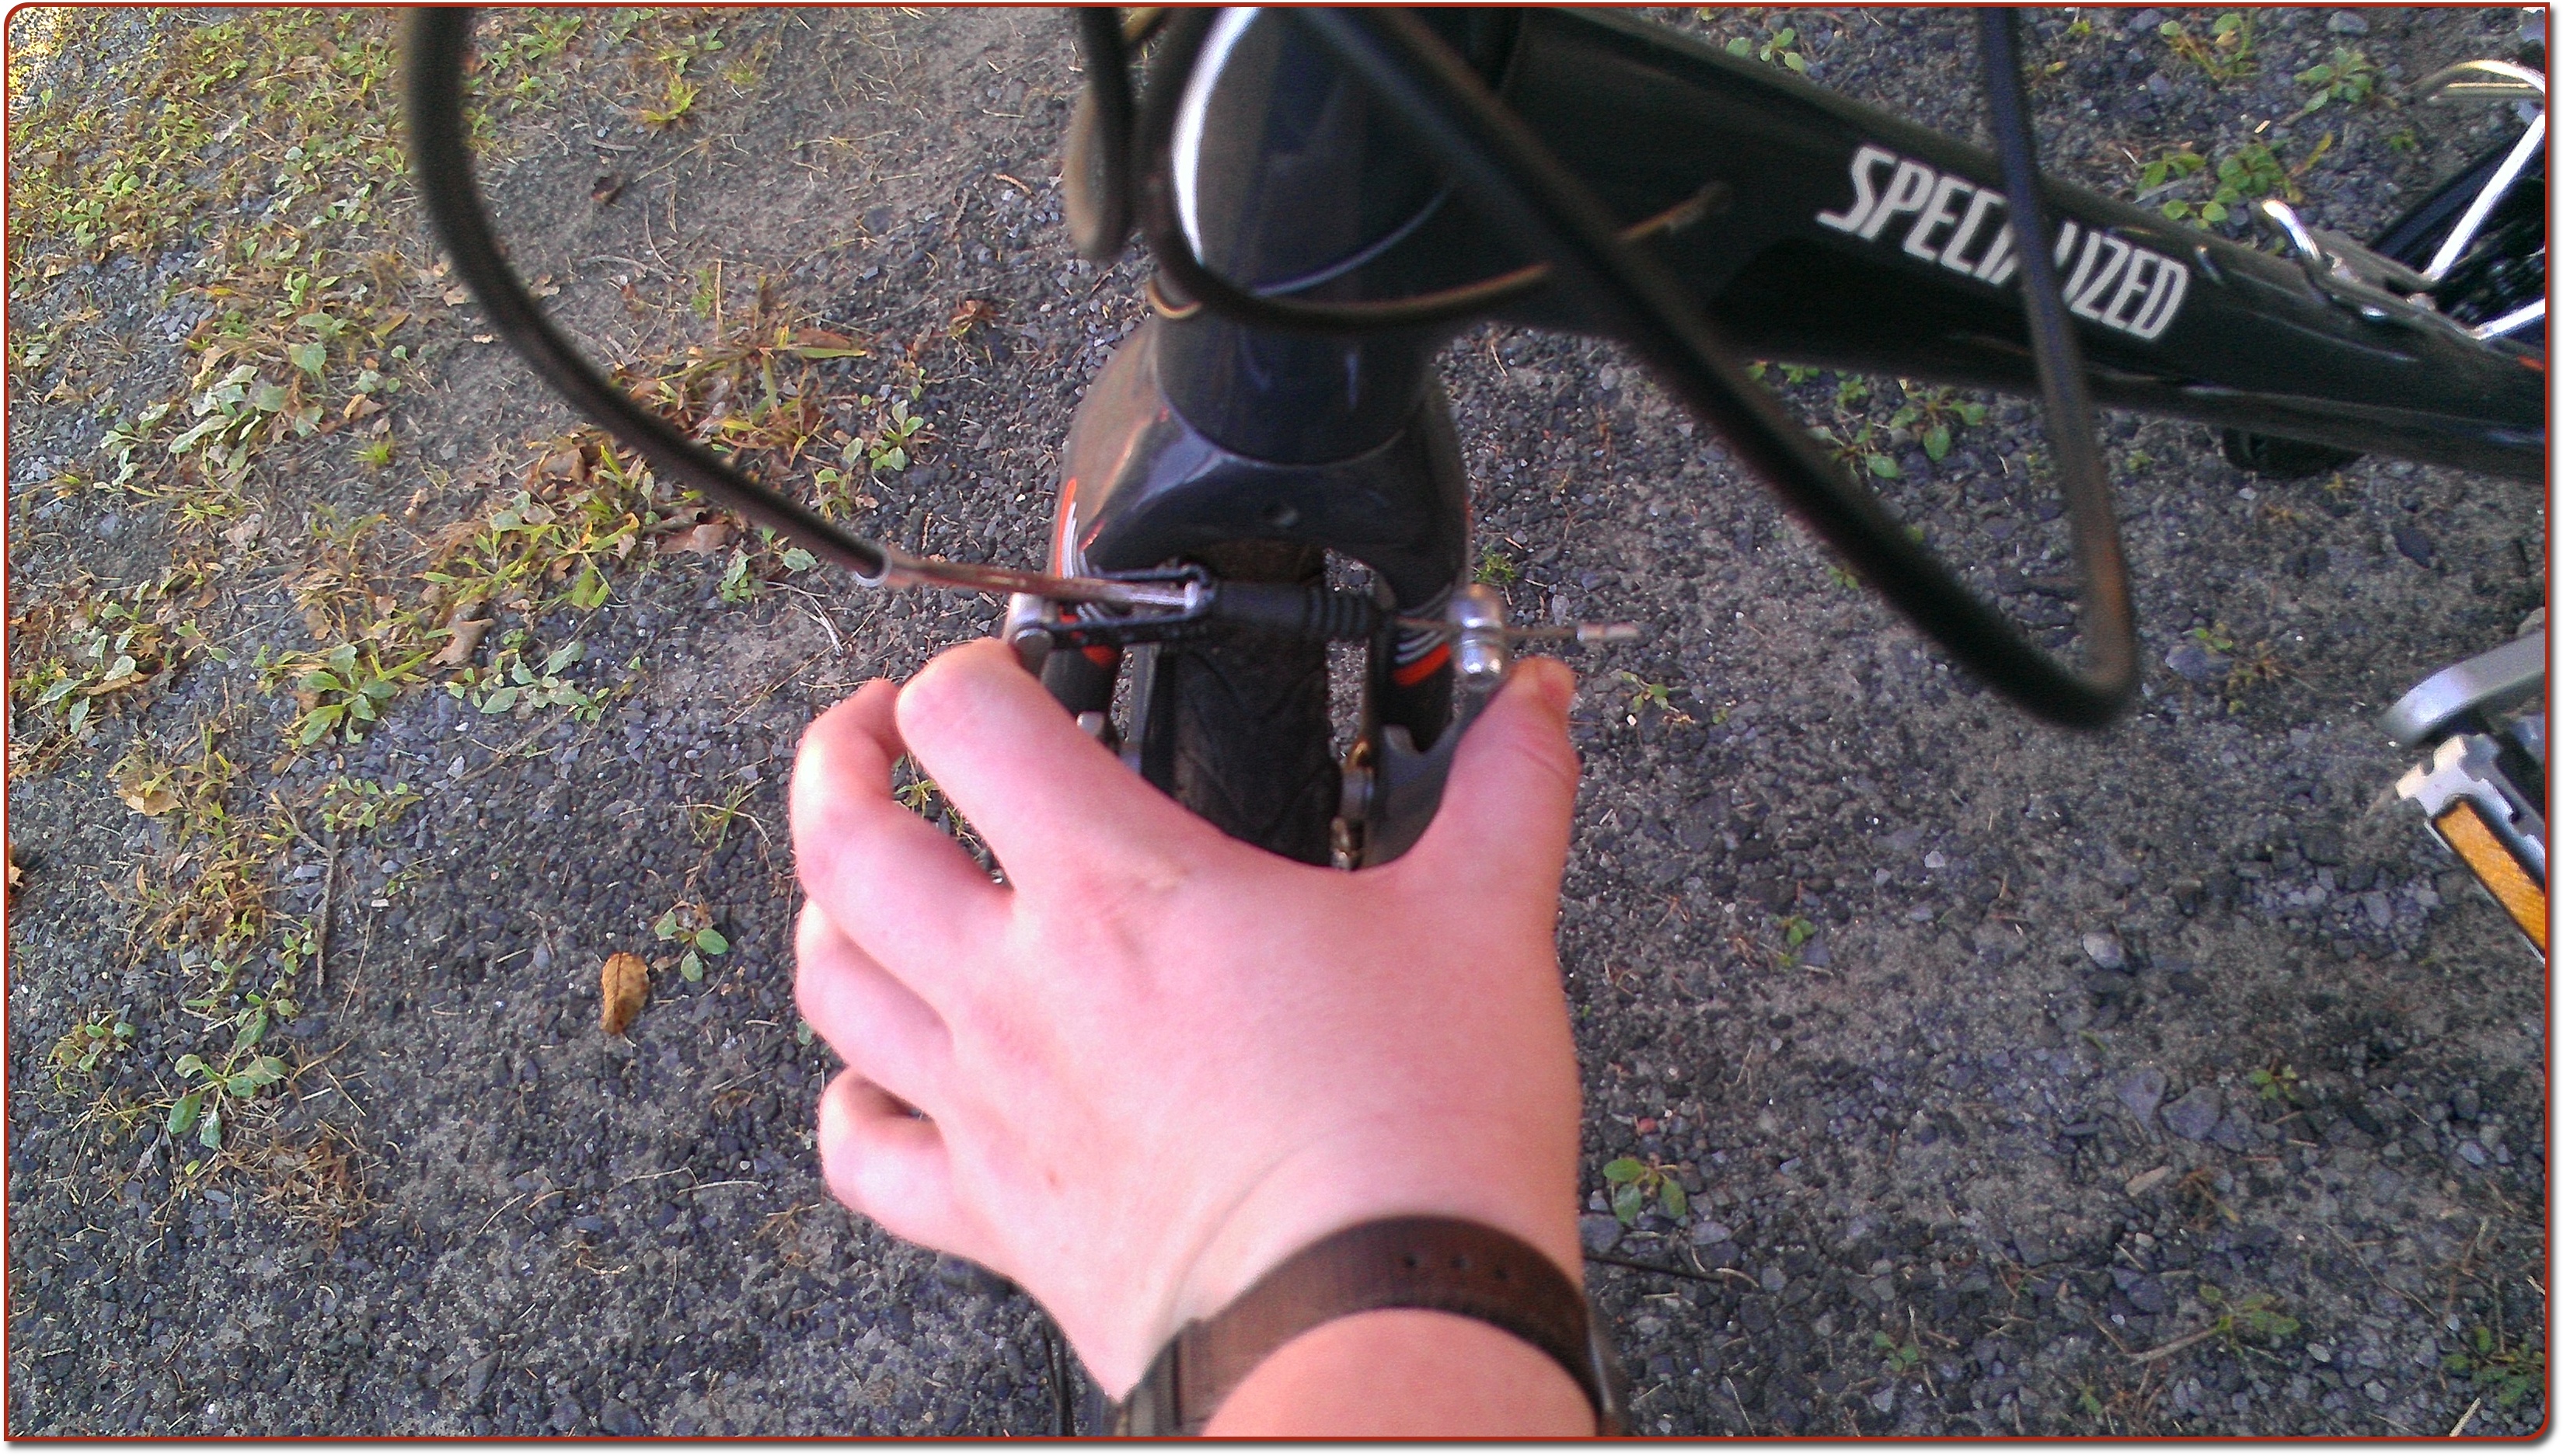
If you have a friend to help hold the calipers closed, that makes it a little easier, but you can do it by yourself with no problems.
Unscrew the adjustment knob as far as it will go
Turn the adjustment knob counter-clockwise until its threads are just about to disengage from the brake pull assembly. This puts the cable housing in its longest-available position.
Now try the brake pull. Do the brakes engage where you like? If so, great!
If the brakes engage too soon, keep gentle pressure on the brake lever as you screw the adjustment knob back in. Stop once the brake lever is in the spot you want.
If the brakes still don’t engage soon enough, your brake cable is probably either too long or is damaged in some way. If you’re comfortable, you can unscrew the cable length setting screw slightly, pull a bit more cable through to shorten it, and then repeat the process. Alternatively, visit your local bike shop and ask for help! (If you want to buy your own replacement brake cable, you can get some here.)
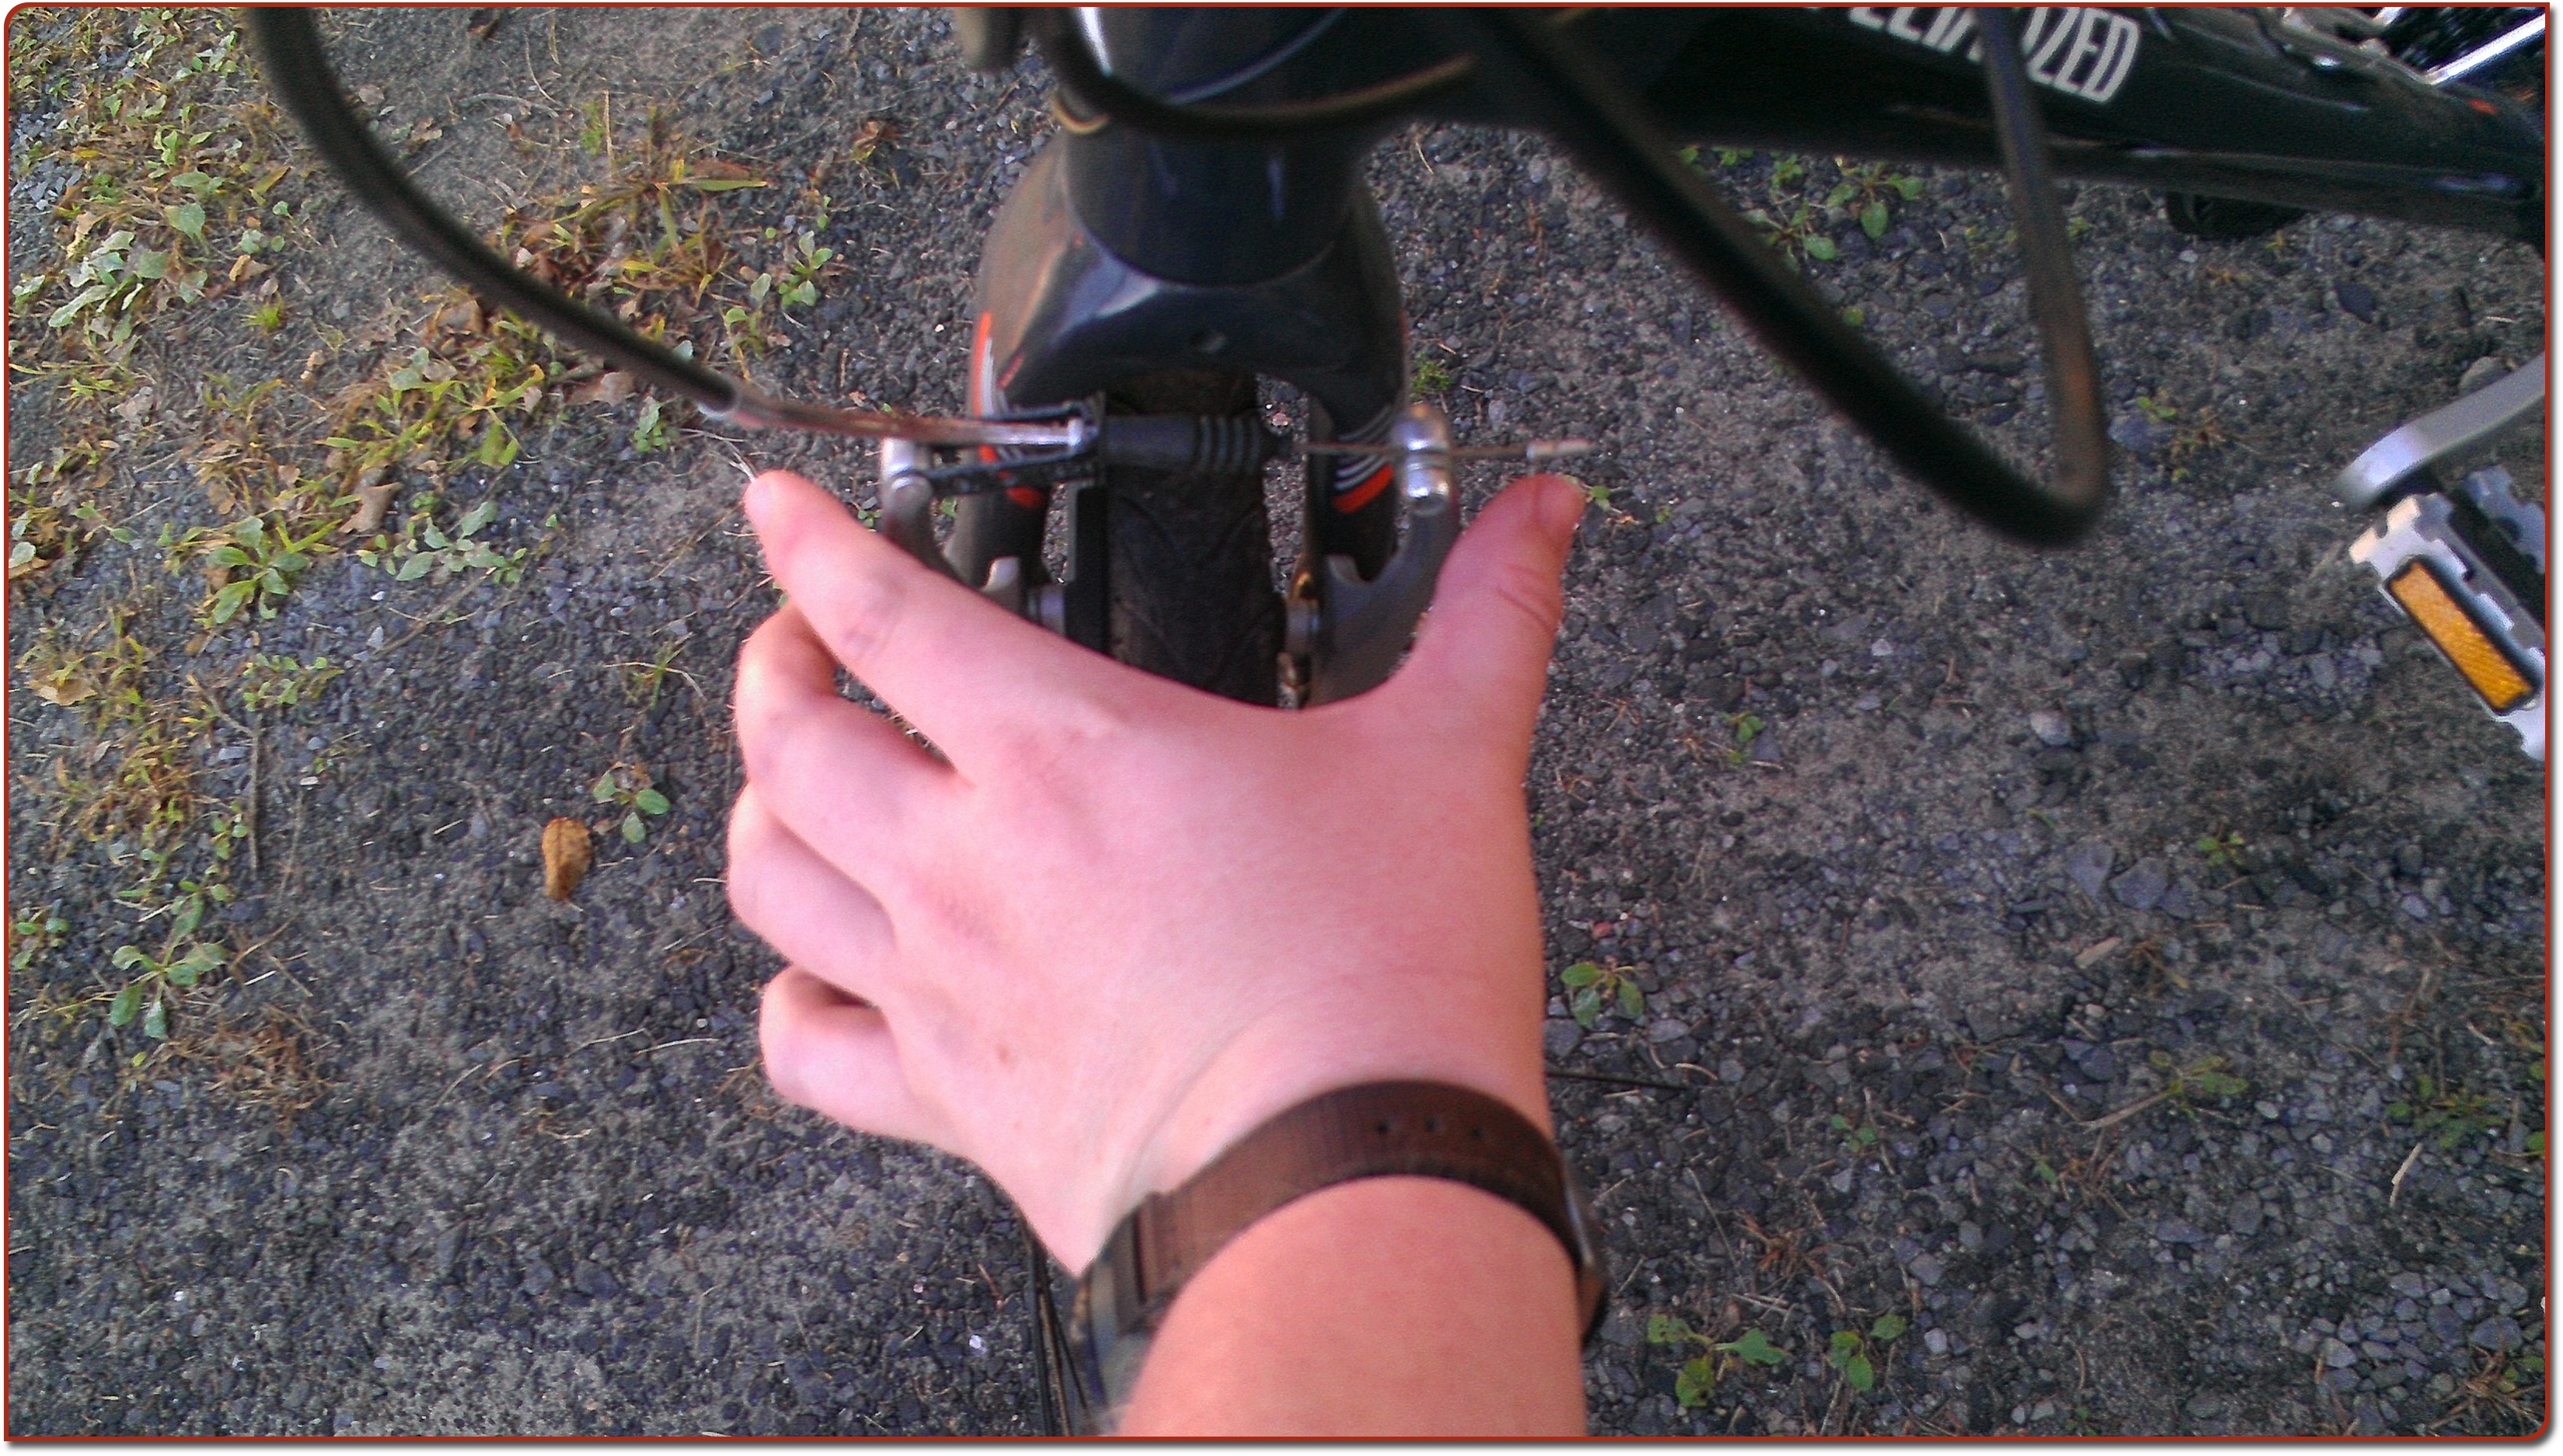
Here’s the cable length setting screw:
If you do adjust that screw, test it rigorously before riding: if the cable slips, you don’t have any brakes.
Screw the lock nut into place
Once you’ve got the lever working the way you want, screw the lock nut down (clockwise) to lock the assembly into position.
Final check
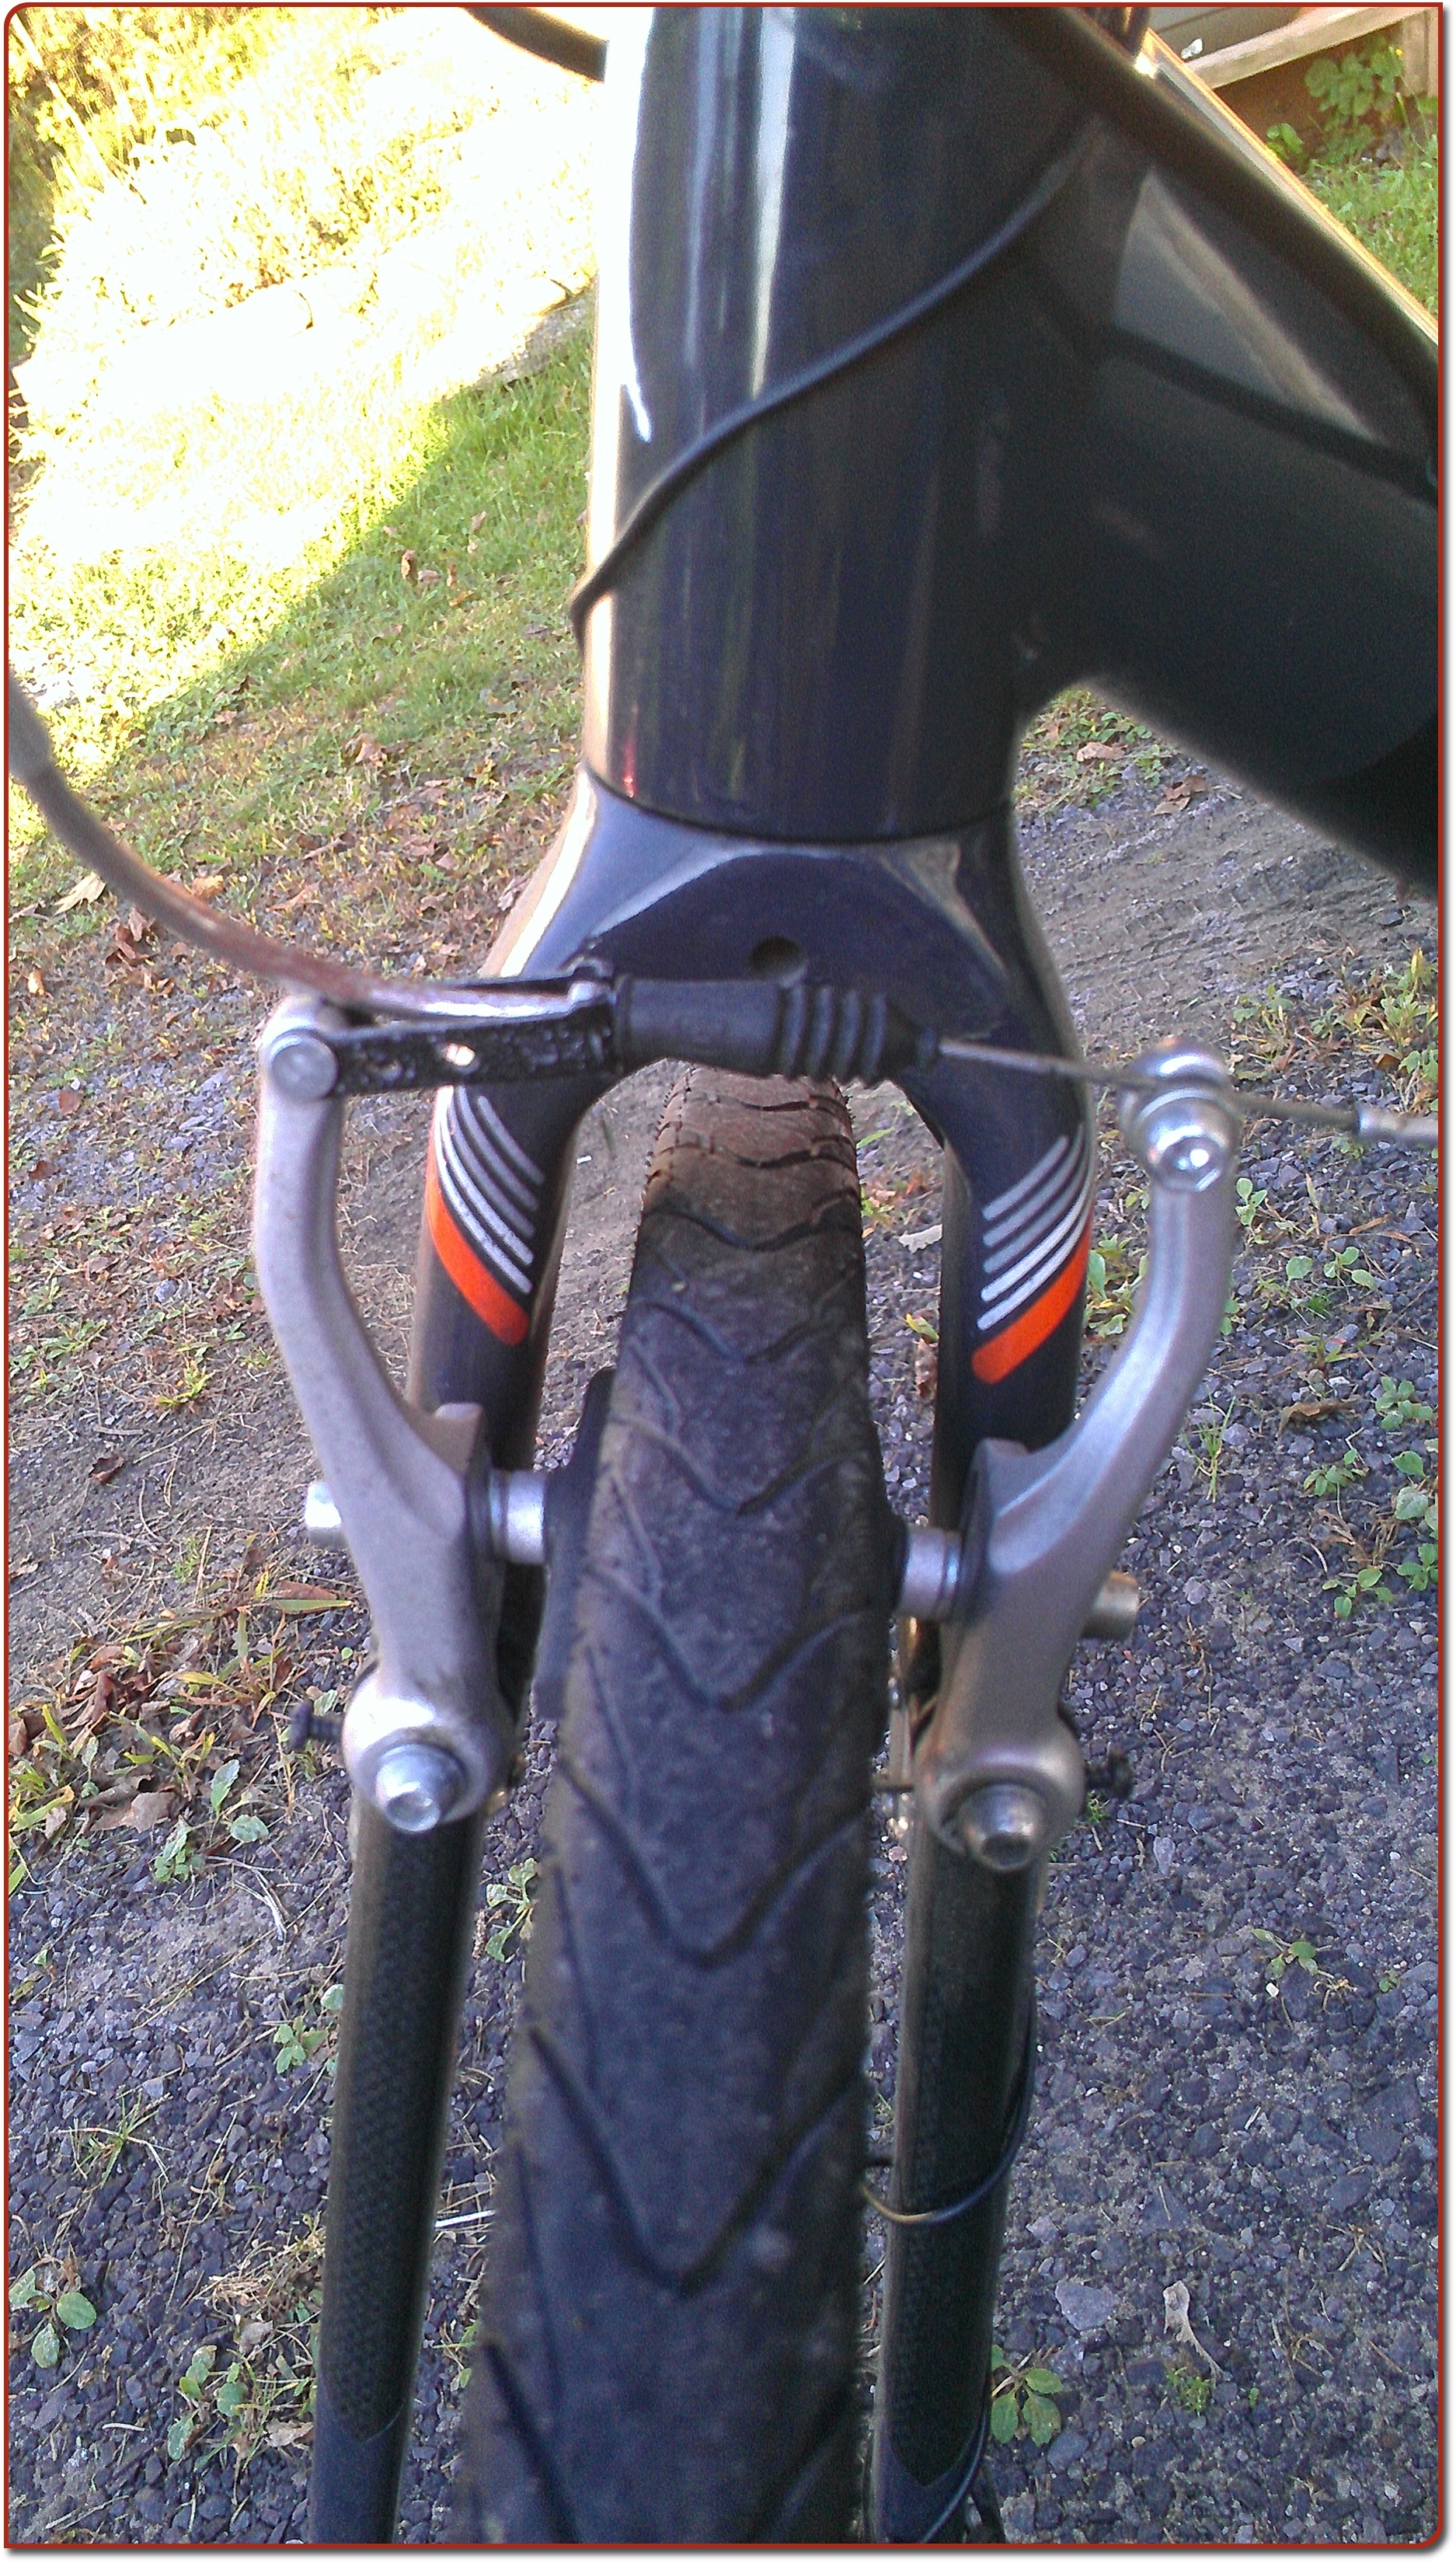
Make sure that the brakes engage when you pull the levers. The fork assembly should look similar to when you started:
Lift the bike so the front wheel is off the ground, then give it a good spin. Listen and look to make sure that the brake pads aren’t hitting the rim. If they are, you need to redo the process and screw the adjustment knob in a little more.
Give the wheel another spin and pull the brake lever. The wheel should stop quickly.
Assuming it does, give it a riding test. If it’s not working, use the other brake to stop, then go back through the process and make adjustments.
Was this helpful?
If this was useful to you, I’d be grateful if you’d send me a buck or two (via PayPal) to help keep this site available for everyone. My local bike shop charges $15 to adjust both brakes, and you can now do it for yourself, for free, forever.
Donation is quick, easy, and secure–just use the button below. Thanks so much for your generosity, and have fun riding!


Do you know how to adjust the little black screws on the side of the brake calipers? They are supposed to set the tension that pushes the arms away from the rim. My brakes lock and hug the rims fine, they just don’t open back up.
Good question! I’m not at my bike right now, but I’m wondering about a lubrication issue. Any chance that there’s some corrosion or gunk on the bearing surfaces where the calipers meet the frame? Also, have you inspected the spring to make sure it isn’t broken?
i ride my bike all the time in the summer and fall it is fun to ride my bike i love to ride it so much
hey thanks man, havent messed with a bike since i was a kid. just finished changing my back tube w/o quick release… no probs. Your pics and description are totally helpful in the brake adjustment process. ty!!
Excellent video on the lever lock nut adjustment!
do you have any clue on how to fix my front break
Knowing how to fix bike brake cables will help you prevent any form of accident and ensure a smooth and enjoyable biking experience. The first thing that you should do is inspect whether your inner cable is clean or building up dirt. If cleaning and lubricating your bike brake cable did not resolve the problem, you may consider replacing bicycle brake cables by following these steps: removing a frayed or bent bike brake cable to prepare for bicycle brake cable repair and replacement, sliding the cable out from the brake lever, cutting and inserting the new cable into the cable housing. Secure the cable to the casing by sliding the caps at the edges of the cable housing into their proper position.
One of the most common problems that you can face with brakes is broken and bent bike cables. It means your brake may not deliver well, which causes you to lose control while riding. Good thing, you can learn how to fix bike brakes cable. Simple ways include proper cleaning and lubricating of the cables, replacing them successfully, and testing for biking.
Learning how to adjust bike brakes rubbing can lower your risk of biking-related accidents. You will feel safer every time you go biking!!. First, you should check the brake pads: If the brake pads have a smooth surface, you must replace them immediately. Then, assess the brake pads’ grip on the rim. Adjust the brake pads until they are at the center of the rim, it should address your issue of bicycle front brake rubbing or rear brake rubbing. Turn the barrel adjuster to the right to increase the brake cable tension. Do the opposite if your brake cable feels too tight. Pull the brake cable outward and hold it in place using your free hand. This maneuver will tighten the caliper and brake pads against the bike’s rim. Testing the brake system is the last step to adjust brakes on a bike.
You only need a few things to adjust your bicycle’s brakes to address the rubbing issue: an appropriate wrench and knowledge of your bike’s brake system.
One of the most common problems that you can face with brakes is broken and bent bike cables. Knowing how to fix bike brake cables will help you prevent unwanted injuries and accidents and its too easy to remember. First Inspect, then clean and lubricate. If cleaning and lubricating your bike brake cable did not resolve the problem, you may consider replacing bicycle brake cables.
You only need a few things to adjust your bicycle’s brakes, a set of 5 or 6mm allen wrenches, a set of open-end metric wrenches sized 9 or 10mm, a 14mm offset brake wrench for centering, some rough sandpaper for re-surfacing the brake pads, a light lubricant and an optional 4th hand tool for adjusting the cable.